ksaitoの日記

日々試したことの覚え書き

macOS High Sierraのアップグレードに失敗

MacBook PromacOS High Sierraのアップグレード通知がきたのでアップグレードしたところ、見事に失敗しました。 1時間ほどアップグレード処理が続いた後にWi-Fiを選択する画面が表示されました。Wi-Fiを選択したところ、しばらくして画面がブラックアウトしたまま、1時間ほど経過...

強制的に再起動すると、ログイン画面が表示されます。 ログインするとプログレスバーが表示されて、また、Wi-Fiの選択画面...

有線LANのアダプタを買ってきてリトライするしかないかな。 クリーンインストールになるかも...

有線LANで無事インストールできました。

優先LANのアダプターを購入してリトライしたら、15分くらいであっさり終わりました。 有線LAN接続して、起動して、ログインするとプログレスバーが進みます。 その後、iCloudのパスワード入力を求められ、Apple Payを設定(スキップ)したら無事立ち上がりました。

iPhoneのアップグレードもそうですが、Wi-FiiCloudを設定するする処理に不具合があるのかもしれません。

Jenkins-cli

Jenkinsをコマンドラインから操作することでコード化することができます。 Jenkinsをコマンドで操作するには、Jenkins-cliに付属しているjenkins-cli.jarを使います。

Jenkins-cliの設定

最初にjenkins-cli.jarファイルのダウンロードとAPIトークンを作成する必要があります。

jenkins-cli.jarのダウンロード

Jenkinsの管理-Jenkins CLIメニューを選択します。 jenkins-cli.jarのリンクからjenkins-cli.jarファイルがダウンロードできます。

[f:id:ksaito11:20171103194736p:plain

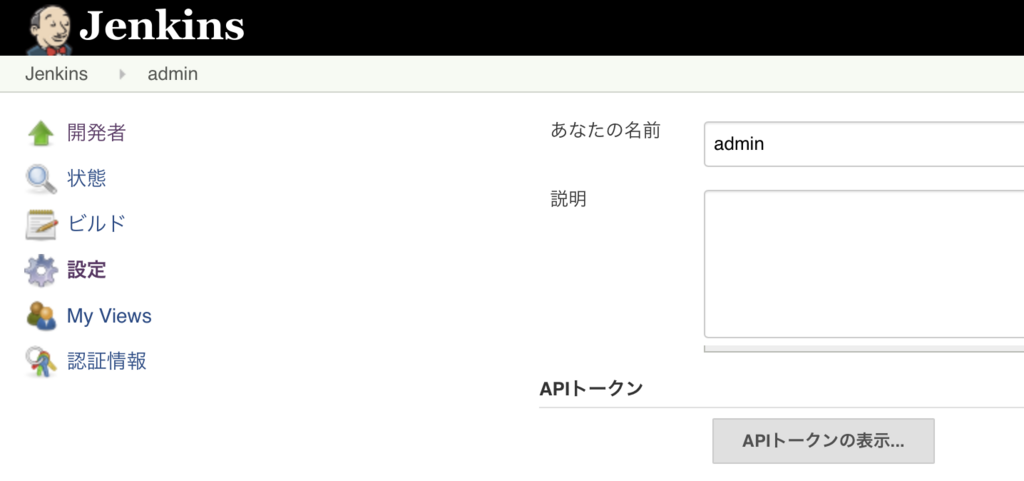
APIトーク

Jenkinsのアカウントから設定メニューを開きます。 APIトークンが作成されていなければ作成します。

f:id:ksaito11:20171103195002p:plain

APIの使い方

下記のようにジョブ一覧を取得できます。 Jenkinsの設定もコードで自動化できます。

e03b5811fd88:/$ export JENKINS_URL=http://localhost:8080
e03b5811fd88:/$ cd
e03b5811fd88:~$ java -jar `find . -name jenkins-cli.jar` -http -auth admin:APIトークン list-jobs
debug
test2
test3
e03b5811fd88:~$ 

JenkinsfileとMakefileの統合

Jenkinsfileをメンテナンスし続ける自信がないので、Jenkinsfileをパイプラインの定義のみで使うようにしました。 定義したパイプラインの各ステップは、Makefileのターゲットに対応させるとメンテナンスし易くなります。

パイプラインの定義

パイプラインは、下記のように定義します。

ステージと同じ名前のターゲットをMakefileに定義すると、開発するときにmakeコマンドで実行した処理がJenkinsのビルドでも同じように利用されます。

makeコマンドをantやmavenなどに入れ替えれば、他かの開発でも応用が利きます。

ステージ 処理
setup ビルドに必要な環境をセットアップ
build ビルド
test テストは、単体テスト結合テストを並列で実行
deploy デプロイ

Jenkinsのパイプラインジョブで実行するとこんな感じになります。

f:id:ksaito11:20171103175600p:plain

パイプライン

Jenkinsfileの定義

pipeline {                              
    agent any                           
    environment {                       
        branch = 'master'               
        scmUrl = 'git@bitbucket.org:***/***.git'                       
    }                                   
    stages {                            
        stage('setup') {                
            steps {                     
                sh: 'make setup'
            }                           
        }                               
        stage('checkout git') {         
            steps {                     
                print "checkout"        
                git credentialsId: credentialId, url: scmUrl                    

            }                           
        }
        stage('build') {
            steps {
                sh 'make'
            }
        }
        stage ('test') {
            steps {
                parallel (
                    "unit tests": { sh 'make test' },
                    "integration tests": { sh 'make integration-test' }
                )
            }
        }
        stage('deploy'){
            steps {
                sh 'make deploy'
            }
        }
    }
}

Makefileの定義

all: build                              

build:                                  
        echo build                      

test:                                   
        echo test                       

integration-test:                       
        echo integration-test           

deploy:                                 
        echo deploy                     

setup:                                  
        echo setup 

Docker for macでコンテナの中からMacのIPを知る方法

I WANT TO CONNECT FROM A CONTAINER TO A SERVICE ON THE HOSTに書かれているdocker.for.mac.localhostで、下記のようにコンテナの中からMacIPアドレスを引くことができます。

$ nmap -Pn -p 8080 docker.for.mac.localhost

Starting Nmap 7.40 ( https://nmap.org ) at 2017-10-15 00:37 JST
Nmap scan report for docker.for.mac.localhost (192.168.5.1)
Host is up (0.00038s latency).
Other addresses for docker.for.mac.localhost (not scanned):
PORT     STATE SERVICE
8080/tcp open  http-proxy

Nmap done: 1 IP address (1 host up) scanned in 0.03 seconds
$

githubの二要素認証を設定するとpush時に認証エラーになる

githubで二要素認証を設定するとpush時に認証エラーになります。

$ git push origin develop
Username for 'https://github.com': ***
Password for 'https://***@github.com':
remote: Invalid username or password.   
fatal: Authentication failed for 'https://github.com/***/***.git/'

下記のリンクにある通り、githubのアカウント-Settingsでpersonal access tokens pageを選択してアクセストークンを作成し、パスワードは、このトークンを使う必要があるようです。 githubのパスワードを何度入力してもダメで焦りました。

Two-factor Authentication · GitHub

ファイルの作成と削除を待つ

シェルでファイルの作成と削除を待つのにinotify-toolsを使います。

インストール

aptでインストールします。

$ sudo apt install -y inotify-tools

ファイルの作成と削除を待つ

waitfile.shに指定した引数のファイルが作成されるのをfilewaitで待ちます。 その後、そのファイルが削除されるのをrmwaitで待ちます。

$ cat waitfile.sh
#! /bin/bash

fname=$1

filewait()
{
    ret=1
    while [ $ret == 1 ]
    do
        inotifywait -q -e create -t 1 . | grep $fname
        ret=$?
    done
}

rmwait()
{
    ret=1
    while [ $ret == 1 ]
    do
        inotifywait -q -e delete -t 1 . | grep $fname
        ret=$?
    done
}

echo waiting for $fname
filewait
echo $fname created!, waiting for $fname remove
rmwait
$

notifywaitの動作

最初は、よくわからず下記のようににファイルを指定してcreateイベントを待とうとしましたが、ファイルがないとNo such fileとなります。

$ inotifywait -e create fin.txt
Setting up watches.
Couldn't watch fin.txt: No such file or directory
$

ファイルがあると永遠に待ちます。

$ inotifywait -e create fin.txt
Setting up watches.
Watches established.

ディレクトリを指定すると次のようになります。 実行後に別の端末からfin.txtを作成すると./CREATE fin.txtが発生します。

$ inotifywait -e create .      
Setting up watches.
Watches established.
./ CREATE fin.txt
$

色々なファイルシステムで試してみると面白いかもしれません。

Raspberry pi 3

Raspberry pi 3のOSイメージをSDカードに約手順です。

環境

SDカード

diskutilでSDカードを認識しているデバイスを確認します。環境毎にことなります。 今回使ったMacBookのSDカードすロッドは、/dev/disk2でした。

フォーマット

下記のコマンドでフォーマットします。

$ diskutil eraseDisk FAT32 "RASPBERRYPI" MBR /dev/disk2
Started erase on disk2
Unmounting disk
Creating the partition map
Waiting for the disks to reappear
Formatting disk2s1 as MS-DOS (FAT32) with name RASPBERRYPI
512 bytes per physical sector
/dev/rdisk2s1: 30338080 sectors in 1896130 FAT32 clusters (8192 bytes/cluster)
bps=512 spc=16 res=32 nft=2 mid=0xf8 spt=32 hds=255 hid=8192 drv=0x80 bsec=30367744 bspf=14814 rdcl=2 infs=1 bkbs=6
Mounting disk
Finished erase on disk2
$

アンマウント

$ mount | grep disk2
/dev/disk2s1 on /Volumes/RASPBERRYPI (msdos, local, nodev, nosuid, noowners)
$ diskutil umountDisk disk2
Unmount of all volumes on disk2 was successful
$ mount | grep disk2
$ 

イメージの書き込み

ダウンロードしたOSイメージを書き込みます。

$ sudo dd bs=1m if=raspi.img of=/dev/disk2
Password:
7535+0 records in
7535+0 records out
7901020160 bytes transferred in 3354.628015 secs (2355260 bytes/sec)
$